Hydroponics: Progress Report 8-Mar-2023

Here’s what’s been done since the last report

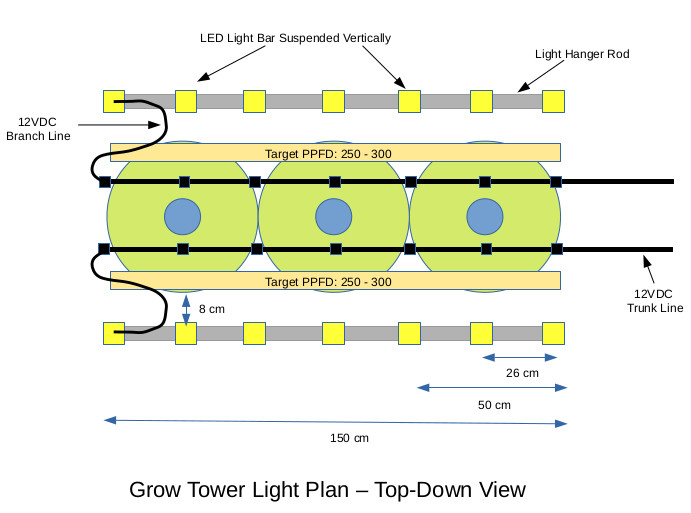
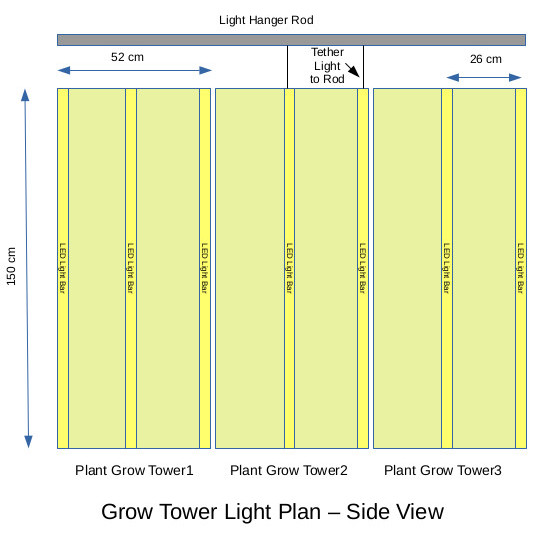
  • Lights arrived, and the ones for Tower 1 were installed
  • Plants were migrated from germination tank to Tower 1
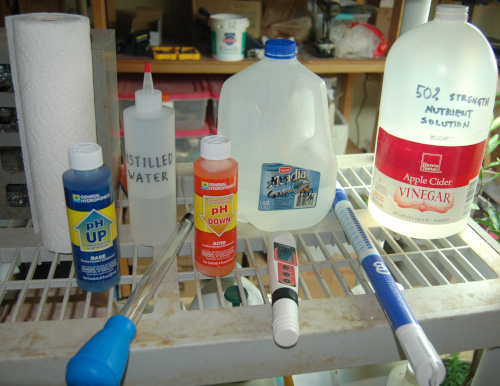
  • The plant nutrient solution management process was established
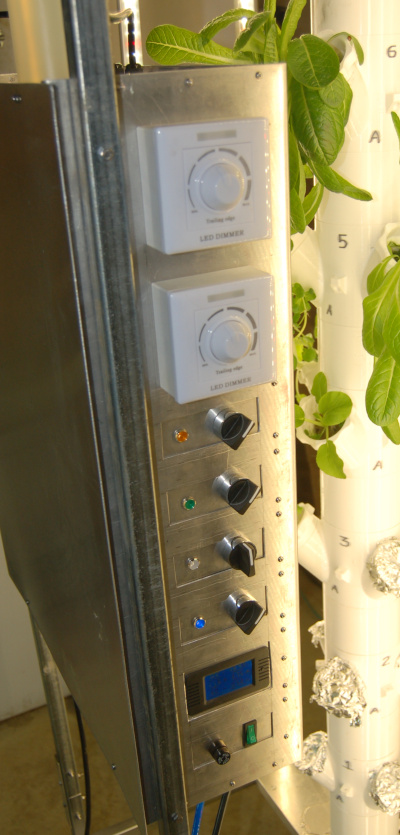
  • The plant light-level management process was established

Here’s what’s coming up next

  • Begin formal testing. Set a baseline of how the plants were at the outset, and start measuring how they progress over time
  • Get good at operations. Some aspects of this – especially managing the nutrient solution – I’m very much the novice at. I need some just-in-time learning
  • Determine what the key operational indicators (metrics) are, and find an easy way to collect and evaluate that information
  • Fix problems. We’ve got issues, and they need to be gradually addressed
  • Germinate some more plants, pronto! We’ve got 8 open slots right now
  • Decide when to begin fabricating Tower 2. At what point am I confident enough in the current design to invest the time and material to extend it another tower?

Issues

We’ve got some known issues:

  • The open tower sockets are admitting light into the interior of the tower cylinder. I want that interior to be dark, dark, dark so no algae can grow there. Need a patch.
  • The trickle-down rate of nutrient solution seemed to change after I installed the plants into the tower. Why is that? Changing flow rate is not a good thing; I want that to be stable, because that’s a key input to the “how often to cycle nutrients” calculation that the robot is making
  • The white plastic I used to print the tower components admits too much light. I need to choose a (much) darker color plastic for the next tower, and I may need to paint or otherwise darken Tower 1
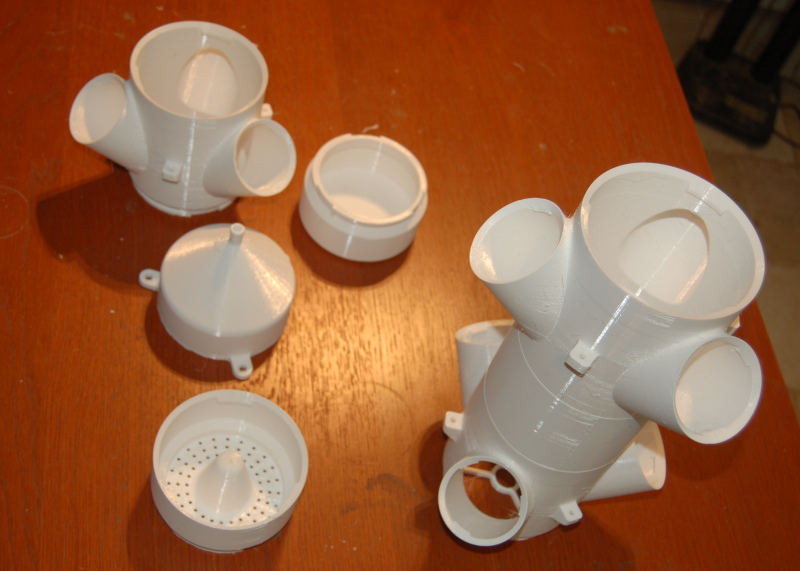
  • The drain collector funnel at the bottom of the tower has an exit opening of about 1/2 inch. That may need to be widened, and for that, I’ll have to design (not just print) a replacement part. That’s going to be a significant learning curve for me
  • It seems possible that roots growing downward from the bottom tier of plant sockets on Tower 1 may get long enough to clog the exit port on the collector funnel. I may need to implement some evasive maneuvers to avoid that problem
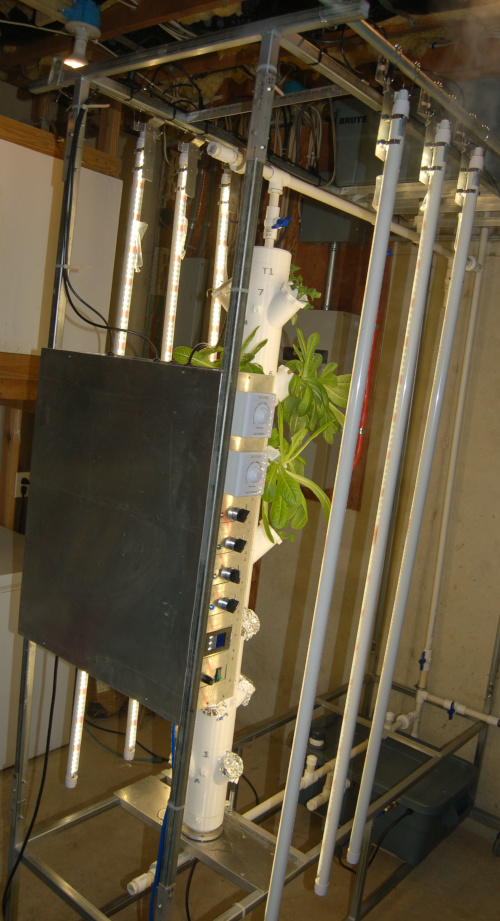
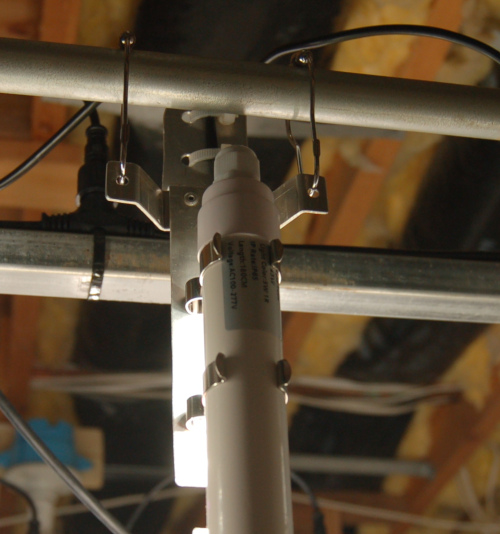
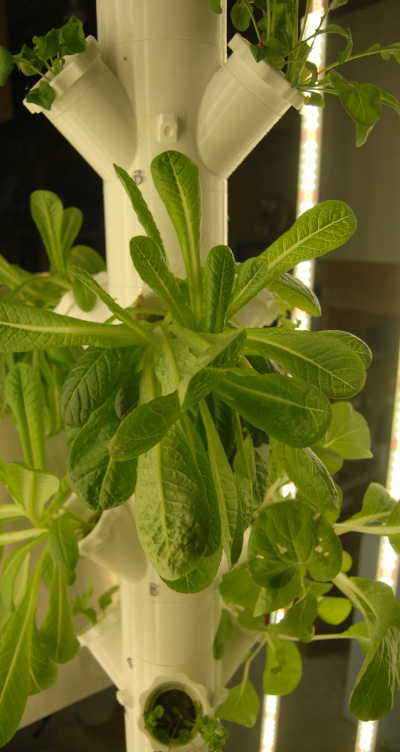
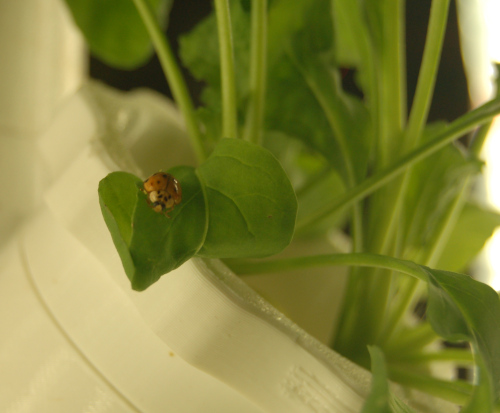
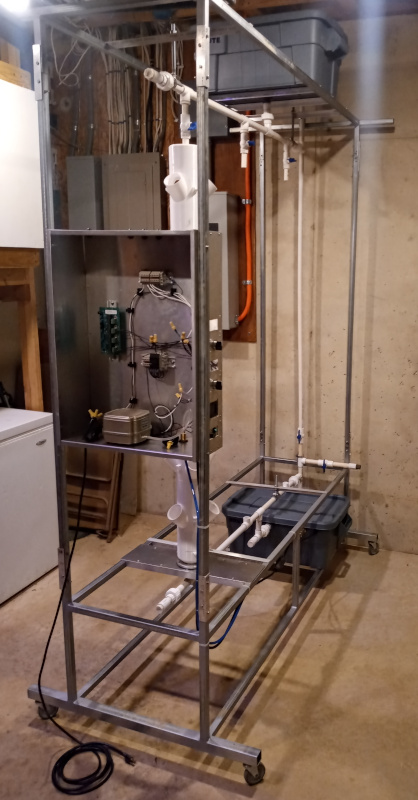
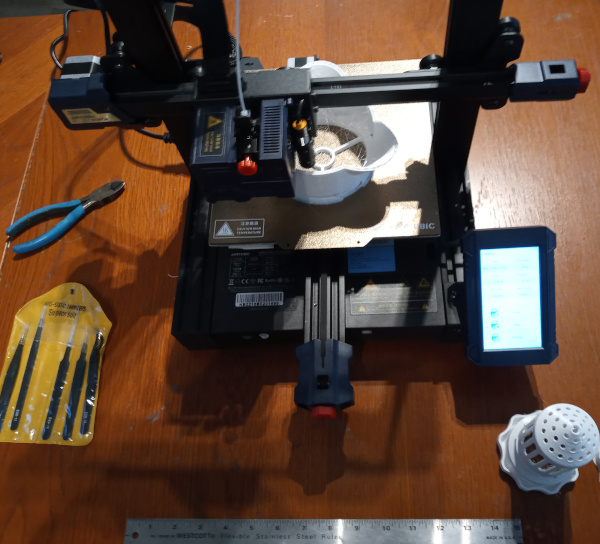
The Pix

Here are a few more pix to give you a better feel for how this thing is coming together.

Baseline system complete, ready for some serious testing. Lights for tower 1 are installed, and the wiring cabinet’s been upgraded to manage the lights
The hanger gizmo I fabricated to hang the light bar vertically, and to allow it to slide back and forth on the curtain rod (note shower-curtain roller-hangers) to permit easy access to the plants
The finished control panel in all its glory (beauty in the eyes of the beholder :). From the bottom: main power, ammeter (power consumption meter), aerator switch, circulation fan switch, nutrient pump switch, light curtain switch, light bank 1 dimmer, light bank 2 dimmer
The plants two days after move-in. While they don’t look great, they’ve really added color and are starting to stand right up to be counted. They’d stayed in the germination tank about 3 weeks too long (low light, insufficient nutrients), and were looking a bit rough two days ago. The blotches on the bok choi (lower right) leaves are from getting too close to the light in the germination tank.
Got friends in the biz! The lady bugs have moved in, and seem quite happy to be here. That means the light is OK for them, and (not so good) there’s some other bugs for them to feed on. Hmmm. Wonder when that’s going to become a problem….
Ratty looking temporary patch to close up open sockets so light doesn’t get into the tower interior and grow algae. Note the leakage on the tower support; that’s from the temp patches wicking nutrient to the outside of the tower. Got lots more plants started in the germination tank, soon as they’re mature enough to move in, the temp patches get retired.
Nutrient reservoir tank upgraded with a screw-off access port (top left). The giant pipette is for measuring the solution level in the tank (black tape marks “full”), and also to retrieve nutrient samples for analysis.
Nutrient management tools. pH adjustment solution (“up” – more base, and “down” – more acid). Distilled water to clean the pH meter. High (middle rear) and low (right rear) concentrate nutrient solution. In front, there’s the pipette for nutrient tank checking / withdrawals, pH tester, and electrical conductivity (EC) “truncheon” – how do you like that name? EC provides a rough measurement of nutrient concentration in the reservoir.
Author: Tom Pfotzer
I'm a retired I.T. worker who runs a farm. Like many of us, I'm trying to figure out how to respond to the slow-motion environmental and economic collapse we're engulfed in. I want to work with people who understand what's going on and are ready to do something about it.

4 thoughts on “Hydroponics: Progress Report 8-Mar-2023

  1. Dear Tom,
    Good day.
    This is Zoe from Zeestarled Alibaba.
    Glad to see your blog.
    From design to completion, the project is great! And very innovative.
    Best wishes to you.
    Zoe

    1. Zoe: thanks for stopping by to comment. Zoe is a regional sales manager who works for the Zeestar LED grow-light company I bought the lettuce system’s lights from.

      I invited Zoe to take a look at these Progress Report posts, so she could see what she helped me build.

      If I may, Zoe, I’d like to tell the readers a bit more about the discussions we had during the design and ordering process, because it’s a great learning experience.

      In a few weeks, I’m going to publish the first version of the Product Development guide that I’m writing. In that guide, there’s a section on team-building. One of the ways to build your team is to select great suppliers. Allow me to illustrate.

      When I started the design process for the lettuce system, I had already used many LED lights. All of them used transformers to convert electricity from what comes out of the wall (Alternating current (AC), 120 volts, 60 cycles a second) to DC current – 12 volts, no oscillation, which is what the LEDs I used needed. So, naturally, I expected to use a transformer (convert AC to DC) in my design.

      Here’s the dialog – paraphrased for brevity, but it’s mainly accurate:

      Tom: I want light bars that use 12VDC as input, are about 6′ long, produce full-spectrum light, and crank out about 40 watts max per stick.
      Zoe: Why are you using 12VDC? You’ll need a transformer. That adds complexity, heat (transformers waste about 10% of elec input as radiated heat), cost and it takes up space. Why don’t you just use AC LED sticks instead?
      Tom: (to himself) Well, I asked for DC lights because that’s what I’m familiar with, and not for any other good reason.
      Out loud, I said: AC will be fine, and thanks for the help!

      So, my supplier, just on the basis of a short conversation, wrung out 5% of complexity, 10% of cost, eliminated a heat source and a point of failure (transformers do fail, and it’s a bother to replace them) from the design. Pretty neat!

      Then I asked for some custom wiring. My design is rather different than most (the light-curtain idea). Note that at the time of the discussion, the lettuce farm was an idea, not a reality. I couldn’t take a snapshot and say “here’s where I want lights, now you see what type of wiring connections and lengths I need”. So I drew some diagrams.

      Here’s key point number two: If you want to communicate precisely, and what you’re trying to communicate is complex, you need a picture. These are the pix I sent to Zoe to help explain what I was trying to do with the lights:

      Top view:

      Top view of the system's lighting plan

      And side view:
      Side view of the system's lighting plan

      I needed to communicate where the lights were going, what their orientation would be (vertical, not horizontal), the distances the wires would have to travel, where the connection points would be, and how much photosynthetically active radiation the lights would have to deliver at what distance from the light fixture (radiation diffuses and diminishes with distance). That’s the “PPFD” spec in the top-view diagram.

      Now that’s a lot of info to communicate, and look at what a good job of delivering that info these two diagrams do!

      It won’t surprise you to learn that I got exactly what I asked for. Perfect manufacturing.

      But that’s not the only benefit of a diagram. As you’ll see when the Product Development guide comes out, diagrams help the designer to evaluate the design, to look at it from different angles. It’s tough to do that job when it’s all in your head, and very easy to do the evaluation and critique job when it’s on paper right in front of you.

      Before I close, I’d like to make one more point about team-work. As I mentioned, I want to build or join teams. Not just any team, but great, powerful, fast, competent product development teams. What’s the best way to do that? Be a good team-member. Be someone that the other members of the team can count on to “hold up their end of the stick”.

      So let’s examine the ledger balance between Zoe’s company and me at this point. Zoe put in a lot of effort – probably a few hours’ worth, at least, to help me get my design analyzed, quality-controlled, and specified for manufacturing (lot of custom wiring, not stock parts!). Then she took time to shepherd my shipment through several steps including pack, deliver to aggregation point, insure pkg got on container ship, communicate ship ID and UPS tracking number to me (once the ship got to LA, the pkg was turned over to UPS). All that takes effort.

      And for all that effort, she got a $250 sale. A pittance. Why’d she do all that work for so little profit? Because her, and her company’s ethic is to deliver their best job, every sale, no matter how big or small. That’s the only rational reason to do it.

      And for my part, my ethic is to “hold up my end of the stick”. In order to put the ledger back into balance, I have to do something Zoe and her company needs. What can I do? Well, I can certainly tell you how good they are, right? So, that’s one reason I wrote this long memo.

      The other reason is that it provides a vehicle to explain two big points:

      It’s worth building a team. You get more done in less time at higher quality if you do. Ask your suppliers to “join your team”. Tell them what you’re trying to do, and ask them to help you. Another, longer-term way to build your team is to become a good team-member. If you have the reputation of holding up your end of the stick, good teams will find you.

      It’s worth building diagrams. A little effort yields big-time benefits.

  2. Hi Tom,

    I am Doris, Zoe’s colleague,from zeestarled.

    Many thanks for your high acceptance for our serivce and led grow light products.

    We will continue to provide you good serivce and grow light products in future.

    I have read all the words you have written, your working and writing both great.

    it will help new grow light growers a lot. and we will share your page to our new customers too.

    I love your words as at below:

    Like many of us, I’m trying to figure out how to respond to the slow-motion environmental and economic collapse we’re engulfed in. I want to work with people who understand what’s going on and are ready to do something about it.

    Tom,nice to know you and hope you can visit China, visit us.

    Nice Day.

    Doris

    1. Doris:

      Thanks very much for taking time to post in. I hope we can continue to work together to create some great products.

      I am quite gratified that you noticed and affirmed the core principle of “we humans face big problems, and we need to work together to solve them”.

      I see new products as the perfect stepping stones from where we are now (econ systems, intentionally or not, are degrading the planet, and are causing great disparities in wealth distribution) to where we need to get – e.g. products that fix the planet, and are designed, built, and especially _owned by_ the many.

      That’s why I selected the lettuce system as starting point; it’s a production process that can be designed, built, operated and _owned_ at the household level. I hope to identify and develop many more such products which serve to build household and village level capacity and enable the household to capture more of the benefits of technology.

      Building these sort of products will serve to create a healthy planet, and a healthy economic environment for all of us.

      And that’s why I think getting really good at product development is such a worthwhile thing to do. More people involved = more and faster progress.

      Finally, it would be a great privilege for me to visit your facility. I would very much like to see what you’re doing, and meet the people that built your company. I hope I can arrange for that visit at some point in the future.

      Nice day to you, too, Doris!

Leave a Reply to Doris Cai Cancel reply

Your email address will not be published. Required fields are marked *